Tuesday, April 30, 2013

Sewing with Ponte

Okay I really wanted to link to the comment that was left about sewing with ponte but I can't find it now.  So whoever asked the question this is for you.

First I think we should start with a definition of what Ponte Fabric is...

Textile.com has this definition for "ponte di roma": 
"A fabric made in a double knit construction, usually produced in one color rather than color patterns. This plain fabric has an elastic quality with a slight horizontal line. The fabric looks the same on both sides. Weft knitted, interlock based, double jersey structure. Means 'roman bridge' which is suggested by the arrangement of loops. The fabric looks the same on both sides."

How about a few pics of ponte fabric...these are all from my collection:

Solid color pontes

Interesting prints in ponte

Prints and solid colored ponte

Where do I purchase ponte from~

Everywhere!  Seriously I own quite a few pieces from Mood Fabrics in NYC ~

Cardigan from a tweed ponte

A Laminated Ponte

These dresses have ponte from Fabric Mart, fabric.com and Vogue Fabrics


...these pieces were all sewn in the last 12 months...

My flat fold fabric collection has ponte from Gorgeous Fabrics, Sawyer Brook and EOS.  See I told you everywhere...and I have it in every color that I like, as well as, a variety of prints and plaids.

+ + +

Now lets start at the top.  You've brought or gotten your fabric home and you know what you want to make from it.  

Pre-treating ~

  • Pre-treating it is next.  So how do I pre-treat this fabric?
  • Into the washer it goes.  
  • Next the dryer on medium heat.  
  • I'm not trying to bake it, just take the shrinkage out of it and any finishing that may have been applied.  
  • A quick press and it's ready for the cutting table.

Here are a few of my sewing tips ~

  • I treat ponte like it's a woven fabric with a little stretch and not a knit fabric.
  • I use a size 80 needle on midweight ponte
  • My stitch length is 2.9/3.0
  • I don't pull or stretch the fabric as I feed it through my sewing machine
  • Otherwise stitch like I would a woven fabric
  • I use a pressing cloth when pressing the seams open and flat.

...and that's it.  Sew up your garment and wear it with pride.  Someone told me that ponte is passe.  I think of ponte like maxi dresses.  At first it was a trend and then the comfort factor kicked in. I think garments made from ponte will be around for a minute just like maxi dresses because for real women comfort is so much more important than trends.  

As previously mentioned, I have a few more ponte dresses planned for this spring/summer.  I hope that you will use ponte in some of your own garments this summer!

...as always more later!


Sunday, April 28, 2013

Building a Notions Stash

LauraSJ asked...
"You mentioned that you usually love to have all your details/notions (thread, zipper, hem lace) match. I think that you also have most of these notions in your stash...that you bulk order thread, zips, etc. (I learned about the now defunct ATS from you) several times a year. What I'd like to know is how you decide what colors in which notion to order and keep in your stash. Have you ever covered this topic? I've been trying to keep a zipper and thread stash on hand, but am never quite sure what to order. What if I suddenly decide that I need an orange top, even though I know orange looks terrible on me? (Yes, I do have a little orange thread in my stash). I'm also never quite sure just how much thread it will take to stitch up a certain project. Thanks!"

It's been awhile since I talked about how I keep and maintain a notions stash and the sources I use to keep it stocked.  I'll start answering Laura's question with my thread source.

Threads ~
I use to purchase my thread from ATS (Atlanta Thread & Supply) which was recently purchased by Wawak.  I buy Gutterman polyester thread in 1,086 yards for way less than the price that you pay for in the craft store. Several years ago I bought the thread color chart so I update colors that way.  Since I own so many colors now (you wouldn't believe how many shades of red there are!) I only stock up when I'm running low on the basics - black, white, red and beige.  I usually throw a few other colors in then because you get a price break when you order 10+.  However, through the end of the month of April they're running a great sale where each spool is $1.86 without purchasing 10+.  

I also buy serger thread from them. I use Maxi-Lock 3,000 yard cones in fashion colors because it's $1.94 a spool for 4 or more. When it was ATS I bought the basics in 6,000 yard spools.  Don't see them on Wawak's site but someone please correct me if I'm wrong.  The entire line of thread can be found here.  I highly recommend using Wawak as a resource.  Their service is prompt, the website is easy to use and they have a really deep product line.


Thread is stored in these small car boxes that I purchased from Space Savers. You can also get them from Nancy's Notions.


Zippers ~
Are purchased in bulk from Daytona Trimmings (who have no online presence). The large ones are 12 for $4 (I think!) and the 9" are 12 for $2 (again I think!). I haven't bought any in awhile cause I have a lot on hand now. Daytona isn't the cheapest resource in the garment district but I have a sentimental attachment to them so I continue to buy from them. There is a wide variety of colors available in both the 22 and 9 inch sizes and of course I keep several pieces (4-6) of the basic colors - black, brown, white, and creme.  Then I buy one or two of every other color they offer whether I have something to sew with them at present or not. That way I usually have the right color on hand.

Other online resources for zippers are ~ Wawak, Mood, Zipperstop.com and Nancy's Notions.

I store the longer ones in the leather tray above which I purchased from TJ Maxx and the shorter ones in a clear jar that I got from The Dollar Tree dollar store. I have several of these jars waiting to be filled with notions.


Piping~ 
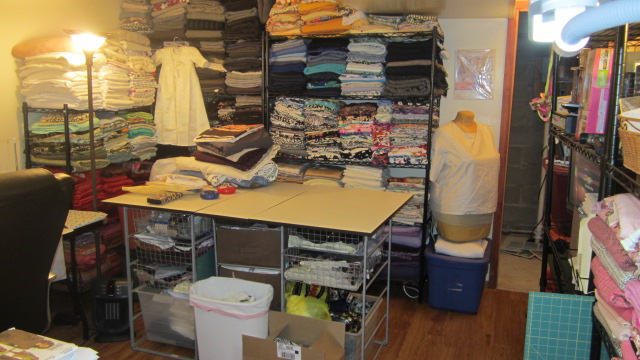
Since I like to add piping to garments, I do keep it on hand. I stock basic colors like white, creme, black, navy and red in 25 yard increments. Again, I stock this from Daytona Trimming because their selection is so deep. I also have a stock of bias binding that I bought about a decade ago from Fabric Mart when they were running a special. It was rolls and rolls of bias binding that I shared with a friend because there was so much. It's stored in the yellow storage unit pictured above. This is under my sewing tables, handy for when I need to apply it. Both of the bottom shelves are full of piping and the top shelves hold sewing machine supplies.

Honestly I don't have any online resources for the piping and bias binding because except for the FM buy, everything is purchased in the garment district. 


Interfacing~
All of my interfacing is purchased online. I have two sources - Fashion Sewing Supply for just about everything. I also buy and stock a really lightweight interfacing called "Baby Interfacing" from Farmhouse Fabrics. Interfacing and lining are stored in the bins above.  All of my cutting and marking instruments are stored in the first shelf of this unit...making them easy to grab when cutting out at the table.


Silk Organza/Lining/Tracing Paper ~
This bin contains bolts of silk organza purchased from Thai Silks. I keep 10 yards of white, beige and black on hand. The tracing paper that I purchase from Dick Blick and use when making alterations to patterns along with the ABC/123 paper that I buy from SIL Threads.  

Finally since I buy white, black and brown lining in 15 yard lengths, it has been wrapped onto cardboard rolls and stand in the bin waiting to be used.  Rayon bemberg lining is bought from several sources both online and in the garment district. I store not only the colors listed above but creme, red, navy and any other color I can find at an inexpensive price.  I store every color that I would possibly use, including colors I find on sale that I know will coordinate with recent purchases. I line almost everything I wear so I have a very deep supply.

Also the large sheets of tracing paper that I purchase from SIL Threads is stored in this bin. I cut it down into manageable sizes for smaller details and leave the larger pieces here for bigger jobs. 


Buttons~
Buttons are stored in the embroidery floss boxes on these shelves. Why do I have so many buttons?  Well it helps that my last job in the Garment District was working for a button company. The company ordered sample buttons from the factory in 5 gross lots. No one cared if I took a dozen or two of buttons for my own personal use. It was actually encouraged since buttons were thrown out (can you believe it?) when no longer needed.  Not shipped back to the factory ~ thrown out

If you knew me at the time, not only did I end up with an amazing button collection, but quite a few of my friends did too!  Even with this vast assortment of buttons, I still purchase buttons from time to time. My sources are mostly garment district sources, Botani Button and Pacific Trimmings being the primary ones. However, I've bought buttons from Sawyer Brook and Fabric Mart too, especially when they were shown with a fabric I was buying.

Elastic~
All of my elastic supplies are stored on the top shelf of this unit next to my Barbie dolls. The stretch and sew elastic I use in my elastic waist pants, as well as, the 1" non-roll and 1/2" non-roll elastic. The non-roll elastic is bought in 50 yard rolls from Newark Dressmaker Supply and Home Sew. Also, the supplies I need to make AG doll clothes for my niece are stored in a box there also.


Trimmings~
This 4 shelf unit (an old Ikea piece) has a drawer for the following things...
- one drawer for all kinds of trims
- one drawer for all of my bindings and rayon seam binding
- one drawer for shoulder pads and sleeve heads
- one drawer for recently purchased trims

Most of my trims are purchased from the Garment District. I have trims from Tinsel Trading, M&J Trims, Joyce Button & Trims, Pacific Trimmings and Daytona Trimmings. I would say most of them come from Daytona.


Rayon Seam Binding use to be purchased from Daytona but lately I've been buying it from SIL Thread in the Garment District because they have a wall (seriously a wall people!) with every color under the sun available for purchase. I have quite a few rolls of rayon seam binding in every color I can imagine sewing but I do know that you can purchase it online from fabric.com and Wawak.


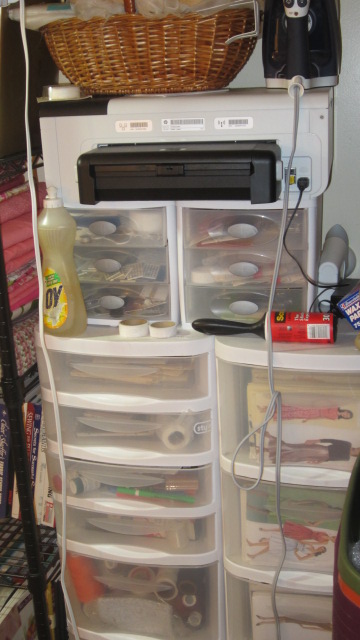
Assorted notions, threads, pressing supplies ~
The last piece that holds notions and pressing supplies is this set of plastic bins. Most of the bins hold patterns but some of my embroidery supplies, fabric paints, stencils, and serger threads are housed here. As noted above serger thread is purchased from Wawak. Fabric paints, stencils and things like that were purchased from Dana Marie Design Co.  

Conclusion ~
I've basically done a tour of the remaining sections of my sewing cave. I thought it was the easiest way to share what notions I stock. I've omitted all the places in the sewing cave that I've stashed patterns, suffice it to say they are everywhere. *LOL* But as you can tell my notions stash is very deep. Over the years I've stocked a lot because I really want to be able to wake up in the middle of the night, go downstairs to the sewing cave and make whatever my heart desires. Maybe this is why my sewing space isn't light and airy...maybe it's why it's stocked like a workroom. The very workrooms I use to visit when I was employed in the garment district. Definitely makes me think about how I've filled the room...

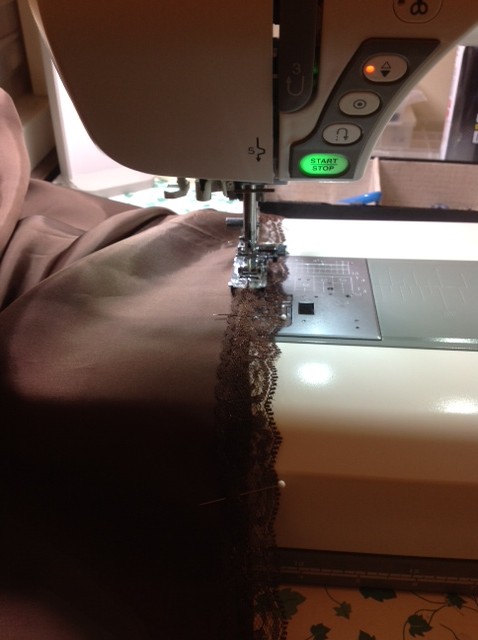
Anyway, Laura I hope I answered your question. I definitely got some understanding on what I've put in the Cave and why. I did sew this weekend. One dress is almost done and another one is all cut out and serge finished because I didn't want to change my serger thread twice.  Lazy I know but I'm fine with that! *LOL*

...as always more later!


Saturday, April 27, 2013

Do you get sewing room envy?

I know I sure do!  Another way you can tell its spring time here in the northern hemisphere, the abundance of spring renovations and upgrades!  Lately several amazing sewists have shared their new sewing rooms with the world and it's made me stop and think...

Look at how lovely Nikki's new room is...

Photo credit:  www.beautejadore.com

Nikki blogs at Beaute' J'adore and did this all for $500!

+ + +

Then there's Jessica's new room...

Photo credit:  www.stitchywitch.wordpress.com

Jessica blogs at Green Apples and she added a lovely chandelier to her room, as well as these kewl border print curtains!

+ + +

Then there is for me the Holy Grail of sewing rooms...


Karen who blogs at Sew Many Ways, whose sewing room I want to crawl up in and sew forever!  Yeap just kick her to the curb and move myself right on in! *LOL*

+ + +

Finally Denise who authors The Blue Gardenia learns to sow her blossoms blog, did an entire feature on my fellow sewists sewing rooms, here.  So whenever I need inspiration I know where to look!

There are so many bright and cheery workspaces out there.  All of them are so inviting and reflective of the owner's personality that I sometimes wonder if my sewing cave actually reflects my sewing personality.  Then I hit the stairs, turn on the lights and sit down in the midst of MY sewing cave and realize that it's home.

It may not have wonderful windows showering light onto me and it may not be spacious with a chandelier but it's mine...dedicated to the thing I love to do.  So while I have a few more ideas to change some things around to give the room a little more function, I'm going to revel in the fact that I have this oasis to come to any time I want!

So here are a few pics of my oasis...


Tell me...do you sometimes see another sewist space and wish it was yours?  Do you even have a dedicated sewing space? If so, would you change anything about it?  This is the Question of the Day so talk back to me!?!

...as always more later!


Friday, April 26, 2013

"You Look Like Spring!"

That was the comment I heard most when I wore the dress to work on Monday. It was T-H-E perfect dress to wear on the first day of a workweek!  Here is how I photographed the dress Sunday afternoon...


Here are the pieces I wore to work...
(I did, however, wear the pin in the above pic!)


...sorry it's on Lulu but my work photographer is a little/lotta pregnant right now so I feel bad asking her to climb the stairs to take some pics...

Some stats:
Pattern ~
TNT dress pattern

Fabric ~
Lightweight wool crepe from Mood NYC

Notions ~
lime green rayon lining
22" lime green invisible zipper
2" white lace
white seam tape
white pre-made rayon piping

All of the construction information is contained in this post.  One more thought on construction - I'm normally a color match fiend.  Thread, rayon seam binding, zipper, etc. all must be the same color but this time I went with the white and green theme throughout.  I really liked adding the white lace and seam tape to the lime green fabric and lining. 

Wearability ~
Usually I sew a dress and then wear it days after I've posted it to my blog.  Since this was my April Mood Project, it appeared on the Mood Sewing Network blog first and since I knew it would be a few days before it appeared here, I wore it to work. So how did it wear?

  • First it wrinkled badly. I had huge wrinkles in the dress front where I sat and also in the back of the skirt where I sat on it.  Not only the fashion fabric but the lining fabric wrinkled too!  Will this cause me not to wear the dress again?  Heck no! *LOL* Because I love the way the dress makes me feel.
  • Next it grew from my body heat.  Now I know that wool crepe grows and yet I sewed it normal size instead of a little closer to my body.  Y'all know I like the image of close-fitting without the dress actually being close-fitted because no one should be subjected to my lumps and bumps.  I'm thinking of taking in the sides a smidge to help with this because the dress was loose in the back by the end of the day.  The cardigan helped disguise it but I knew.
  • I should have run the piping all the way to the hem. I don't know why I thought it would be cool to have it stop at the top of the pleat?!  Stopping the piping there causes the pleat to poof out when I walk. Now I asked two co-workers what they thought and they couldn't see anything wrong with it...but if I were to make this dress again, I would extend the piping all the way to the hemline.


Questions ~
There were a few questions related to the making of this dress that I'd like to answer.

Scenic Route asked:
"On a recent post you mentioned the need to use light interfacing on the neck, sleeves, etc that are to be piped.  However, I didn't see that step on this dress, is it not always necessary?"

The short answer is no.  The more involved answer is, it depends.  Why does it depend?  In this case, it's because the fabric is a wool which means that with a little steam, I can mold and shape it, manipulating the fabric to match the lining fabric.  The fabric in the Butterick 5147 dress was stretched out of shape due to the handling of it.  I should have noticed it sooner and added the interfacing instead of just plunging ahead.

Malady asked:
"I've never stabilized a neckline. Can you explain how?"
I've posted about this before complete with pictures.  This post details how to add the interfacing to the piece.  If you have any more questions, leave them and I'll answer them.

splainer asked:
"What do you like to use for piping on your wool crepe dresses?"
Honestly I'm lucky since I have such great resources in NYC.  At Daytona Trims, they sell rayon piping in a million colors.  Since I like piping so much I stock/stash it in several colors (black, brown, red, navy, white & creme). I've also picked up a few special combos to stash.  I've also made my own piping especially when I wanted a special look or for it to coordinate with my fabric.  There are a lot of great tutorials out there on how to make piping so I guess I would google it and figure out which one made sense to you. 

You can purchase piping at Mood.com.  Daytona doesn't have an online presence but they have an awesome amount of piping in their store.  Pacific Trimming also has piping in their online shop, although I've never purchased from them online. If you want something, I would call them with any questions.

A few more pictures ~


Conclusion ~
It's my TNT (tried 'n true) dress so of course it was a great place to start.  It was easy to wear and the fabric was a dream to sew.  It's the perfect dress for my Fun in the Sun Summertime Dressing Collection.

...as always more later!


Wednesday, April 24, 2013

An Early Spring Version of Butterick 5147

So the last couple of posts have been about what's inspiring me. I'm sure you've been wondering when you'll see something I've actually sewn. Well I've been working on this dress for quite awhile (since March 24th)...a lot longer than it normally takes me to make a tried 'n true (TNT) dress. 


Instead of being annoyed about the amount of time it's taken, I've quite enjoyed the journey.  Probably because I've added so many "details" to a simple silhouette. As I mentioned before this will be my sixth version of the dress and this time around I added even more details...


There is piping added to the neckline and armholes.  
Piping that I made myself.


A lining with a lace hem

Piping at the dresses' hemline

...at one point during the process I considered adding a placket to the neckline front like this Talbot's dress...


...but after pulling the piping off the neckline and letting the dress sit for a minute, I decided that my original idea for this dress worked just fine and I should go with that.  However, I did decide to add piping to the hemline.

Piping at the hemline ~
Since the piping is an integral part of the dress, I decided to extend it to the hemline.  Here in pictures is how I did that...


First I measured up an inch and a half at the hemline, pressed it flat and then cut it off the hemline.


Then I serged the cut edge because 
this fabric ravels like the dickens!


I added rayon seam binding 
to the bottom edge of the band.


Pressed the band flat and folded 
the seam binding over then pressed flat


Serged the cut edge of the dress and pressed flat


Handstitched the remaining piping 
to the hem of the dress.


Pinned the band to the piped 
hem and stitched down


Topstitched 1/4" from the piped edge 
on the front of the dress


Inside edge showing hem tape which 
was hand stitched to the dress


Finished hem edge pressed flat


Other thoughts on the dress ~
  • The interesting thing about this dress is that it fits a little tighter than it's predecessors.  I know that I added a few inches to the brown & orange tweed version, however, all of the other renditions have been made straight from the TNT pattern.  I'm thinking it's the fabric I chose for this one.  
  • Other than that my only concern about this one, is that I will need to be careful with this fabric. While a woven fabric without an apparent loose weave, there is still a delicateness to the fibers, which raveled like crazy during the construction process. After handling it for the last month, I'm concerned that too much rubbing on the fabric will cause piling. I will keep this in mind when wearing the dress. I will also have to make sure that there isn't too much stress on the seams due to the fabric's tendency to ravel.
  • This is a spring/early fall dress because of the weight of the fabric and lining. Once the temps start to rise, I will need to put this one in the back of the closet. I will get at least one wearing out of it before summer comes roaring in and that's fine. It will be nice to look forward to wearing this in the fall.

Some stats ~
Pattern ~ 
Butterick 5147 - now discontinued and out of stock on Butterick's website.

Fabric ~
A linen brocade purchased from Emmaonesock

Notions ~
Piping made by me
22" invisible zipper
brown rayon bemberg lining
linen bias binding
1" brown lace

Some more photos of the dress ~


Finally ~
I will probably make more renditions of this pattern in the future because it works so well for my day job. Presently though, there are no new ideas for it on the horizon. But, if you have this dress pattern in your collection, I highly recommend that you take it out and use it, it makes a great dress.

...as always more later!


Sunday, April 21, 2013

Construction Details for a Spring Wool Crepe Dress

The cold and the dark are gone.  The mornings get brighter earlier.  The days are not only light longer but they're getting warmer too and I feel like the bears that have come out of hibernation...this is MY time of year.  I love spring!  I love warm breezes and sunny days.  I may not be an outdoors kinda girl but I love this time of year especially because it means that I can wear skirts and dresses ALL.THE.TIME!

So of course my next project is a dress.  Hey, you knew that before I typed it! *LOL*  AND of course it's from my tried 'n true (TNT) dress pattern.  I made this dress back in 2008.


Lace was used to emphasize the pleat on the front of that version but this time I went with my next favoritest embellishment, piping, since I've sewn a lot of lace lately.  Yes, I know I've been piping everything in sight too but I need just a touch of white for this dress and I can add it best with some piping.  

I'm starting with a lime green lightweight wool crepe from Mood Fabrics... 


This will be my Mood Garment for the month and the first dress in my, "Fun in the Sun Summertime Dressing" Collection.  So besides discussing what I'm making, I wanted to share some of the construction details...

First up was making the pleat. I've done a pictorial version of the instructions this time but the original dress post contains concise directions also.

Added 3" to the dress center front

Full length view of the 3" added to the dress front

Marking the cutting line for the neckline

To sew the pleat, I sewed a line of stitching where the original "place on fold line" was then I pressed it down and flat.


The next sequence of pictures is how the dress was assembled.


Piping added to the neckline

White 2" lace added to the lining hemline

Close up view of the lace

Lace seam tape was added to the dress hem so it
would match the lining lace

The neckline and pleated front with white piping

Sleeve with piping detail at the hemline

Sleeve inserted into the dress

The dress took about 10 hours to make between Saturday and Sunday.  I know  because I clocked the time.  See after watching The Great British Sewing Bee, I wanted to know how long it takes me to complete a dress with a lining.  Yes, I did add a degree of difficulty by using so much piping on the dress but you know I wasn't going to have an unembellished dress.  Just wasn't going to happen. *LOL*

The most time-consuming parts of the dress were the piping (of course) because I hand stitch all of the piping down before sewing it into a seam.  Also, the sleeve hems needed to be faced and the hems (both dress & sleeves) were hand stitched.  

I did figure out that I can cut out and sew my dress shell together in two hours ~ that's including sewing in the invisible zipper.  It's adding all of that extra stuff that takes so much time...but it's all of the extra stuff that I really like and what makes the dress so special to me!

The dress featured above has been retired.  I loved wearing it and it's why I wanted another one.  The lime green & white shout spring to me and I'm loving the combo...so here is an outtake from the photos taken earlier this afternoon...


The dress will appear on the Mood Sewing Network on Tuesday.

...as always more later!


LinkWithin

Related Posts with Thumbnails